Saturday, July 20, 2013

Art Deco Speaker Enclosures

I am building a bookshelf and want to incorporate into it the speakers that I use for my television. This is the design using Sketchup for enclosing the subwoofer speaker. I need a porous material to allow the sound to radiate so in this project I decided to use metal. This is my first venture into using this material.


My usual construction style is Arts & Crafts. I've decided to depart from that style for this project and try Art Deco using sapele veneer. I'm no expert, but this style uses metal, contrasting pigments, and curved profiles. The curves are especially challenging because I solely use veneer. The previous posts show my construction techniques for the veneered shelves. I have two enclosures that are a mirror of each other. The left enclosure holds the woofer and the right is empty. Since the woofer emits sound from the front and right side, the porous metal needs to be on these sides.

The left side of the enclosure is a slightly curved surface using sepele veneer. It has been bonded to a piece of 1/8" MDF. The curve is created by forcing the MDF into routed curved slots in the top and bottom pieces.

For the porous metal, I've used sheet aluminum that is 1/32" thick. Creases are very noticeable, so cutting it was a concern. I've quite successfully used my tablesaw with an old crosscut blade. I've painted and used a water finish before inserting the metal. The blue tape protects the wood from scratches when I install the metal sheet.


The curve in the metal sheet is formed by bending it around an aerosol paint can. The cutouts in the back accommodate the speaker wires and power connection.


Curving the surface of the sheet creates a fair amount of vertical strength, but the rest of the enclosure is intended for vertical support and the ¼" plywood inserts resist racking in the front-to-back and side-to-side directions.

This enclosure is on a shelf which is the bottom of the bookshelf. A square hole in this shelf will allow the woofer to sit on the floor. I'm hoping this will allow the bass sound to still radiate into the floor and prevent unwanted vibration into the bookshelf.

Sunday, June 9, 2013

Rounded Corners on Veneered Wood

Solid Wood or Veneer?
Last month I asked whether this was solid or veneer. It is actually sepele veneer on plywood. Sepele is similar in color and grain to mahogany. I have strips of mahogany on the edges and the challenge was having the curved corner. Finish hasn't been applied yet and my intention is have it appear to be solid mahogany.


I'm going to show the processes to create the curved corner. After gluing the mahogany strips to the edges of the plywood, I cut the two corners off diagonally.


I then glue a piece of mahogany to the corner edges. I need a 4" radius so I made the mahogany strip wide enough to cut to this measurement.


I've inserted a metal dowel pin that my router circle jig used for the center and rounded the corner.


I'm starting to run out of mahogany so here I glue two narrower pieces.
These pieces need to be cut flush to the edges before using the circle jig.

Lastly, I patch the hole from the dowel pin and veneer both sides with the sepele. The mahogany edges are then rounded over on my router table.


Thursday, May 16, 2013

Use Solid Wood or Veneer?

Solid Wood or Veneer?
I have issues with using solid wood.

  • There are few lumberyards where I live (Colorado) that sell solid wood. The big box stores have a limited selection of hardwood: red oak, birch, and maple. We have a Rockler and Woodcraft store, but solid wood is expensive.
  • With solid wood, the construction must accommodate expansion and contraction.
  • A joiner and planer is very handy when working with solid wood, but I just don't have room for them.

  • To address these issues I typically use veneer over cabinet-grade plywood. The benefits are
    • Cabinet-grade plywood is readily available at the big box stores. It may already have a paper-thin veneer of oak or birch on it, so I just glue my veneer over it.
    • Plywood is less susceptible to issues of wood movement due to humidity fluctuations. This simplifies the design and construction.
    • Veneer is significantly less expensive than solid wood as it should be; you are only getting a fraction of the wood. Higher quality veneer is around 1/40" thick. This may sound like it could be easily damaged, but its pretty resilient when glued to plywood. I wouldn't recommend abusive applications like stair treads, but book shelves, cabinets, and many table designs could easily use veneer.
    • Some awesome veneer is available on the internet. I've been buying veneer from Certainlywood for years.
    Often veneer strips may be only 4" to 6" wide, so they must be glued side-by-side when a wide board is required. Because the veneer edges can be fairly uneven, I first cut them straight. When I started to use veneer, the biggest challenge I had was tearout when cutting them. I've discussed my solution to this problem in an earlier blog.

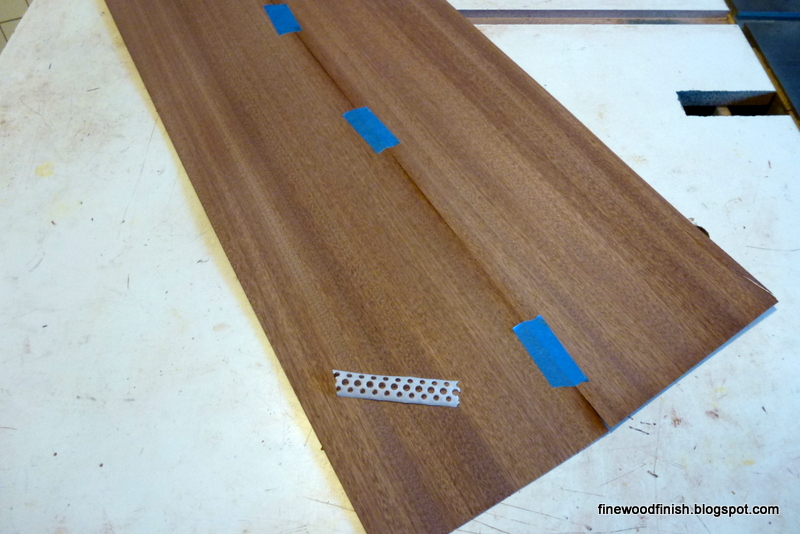
    Tape holds the veneer strips together when gluing. First I use blue painters tape to temporarily hold the pieces, then I turn the veneer over apply veneer tape to hold the pieces during the gluing operation.
    The veneer tape is the white strip with holes in the picture on the right. It has an adhesive backing that is activated with water like a postage stamp (used to be). Because the tape is so thin, its outline won't be pressed into the veneer. When the tape dries, flip the veneer over again and remove the blue painters tape.

    I use Titebond II glue to bond the veneer to the plywood. I frequently stain the veneer using a water-base dye and before I started using Titebond II, I experienced some veneer delamination. Some woodworkers have raised concerns that it may setup too quickly, but I've never had a problem. I usually clamp it for an hour to assure a secure bond.

    I'll talk about edge treatments in a later blog entry.


    Monday, April 15, 2013

    Aligning Drawer Fronts

    Continuing my kitchen cabinet project, I've just finished the middle cabinet section which hold three containers for trash and recycles. There are two drawers on the top of the cabinet. In this posting, I will describe aligning drawer fronts to achieve a minimal gap. On the left is the completed center section of the cabinet. Additional cupboards and will be attached on both sides using sliding dovetails.

    For the drawer runners, I wanted to use some inexpensive Blum rails that I had purchased but never used. The drawer front needed to be inset in the cabinet frame but the Blum instructions didn't show this.  By recessing the rail by the thickness of the drawer front into the cabinet, I was able to accomplish the look I wanted.

    The challenge is mounting the drawer front to the drawer with a uniform gap around the drawer. The two screws of the drawer handles hold the oak face to the drawer. I use playing cards as shims to create the required gap around the door. Playing cards are remarkably consistent and accurate. Six cards is very close to ¹/₁₆". I first drill two holes for mounting the handle and then use the cards to center the front in the frame (right). Then, I use the holes to align drilling two holes into the drawer.

    Only drill a shallow hole just for alignment purposes. Clamp a scrape piece of wood inside the drawer to prevent blow out from occuring and then finishing drill the holes all the way through. 
    Next, I will install this section in the kitchen and then construct and install the cupboards.

    Thursday, March 21, 2013

    Sliding Dovetail Update

    For my kitchen cabinet project, I wanted to use a modular approach to installing cabinets. Typically each cabinet is standalone, and are bolted together as they are installed. This means that between the cabinets are two walls, the right side of the cabinet on the left and the left side of the cabinet on the right. In furniture cabinets, only one wall would be used. I'm using sliding dovetails to allow cabinets to be interconnected while sharing a common wall.

    The final cabinet will consist of five interconnected cabinets. The center cabinet shown below will hide trash and recycle containers on a pull out shelf. I plan to install this cabinet into the kitchen and then connect additional cabinets by sliding their walls into the corners of the installed cabinet.


    The jig that I described in my sliding dovetail blog entry is working well. The cabinet sides are square and secure and if I need to use my router table for something else, the jig allows me to replicate the precise positions necessary to duplicate a cut.

    Mission Style Finishing

    Quarter-sawn white oak veneer purchased from Certainly Wood is used on most of the exposed wood surfaces. The panel frames on the pull out drawer face were made from recycled oak flooring. To have a 1" wide frame, I've ripped and glued together two flooring pieces. A white oak veneer hides the glue seam. To strengthen this frame, I've inserted dowels (shown on the left) and then to hide them, I applied another piece of veneer (shown on right).

    Since this blog is oriented to wood finishing, I wanted to discuss my revised Mission Style finishing treatment.
    I do a lot of Mission Style finishing and have some recipes on my blog. Here are my NEW easiest steps, with most products available from your local big box store.


    1. Sand the wood surface to 150 grit.
    2. Use a very diluted water-based dye stain. It should look like a weak tea. This dye colors the wood but allows the rays and flakes to still be visible. Spray the dye if possible, otherwise flood the surface. For the dye, I use TransTint. It's in the jar on the left in this picture.
    3. Let the dye dry thoroughly and then spray with an unwaxed shellac (Bulls Eye, next to the dye in the picture). This protects the dye from subsequent steps.
    4. I use Minwax Gel Stain to highlight the grain and figure in the wood (third from the left). I mixed one part Mahogany to four parts Antique Maple to get the color I wanted. After a minute or so, wipe the stain off across the grain. This leaves stain in the grain.
    5. This is important, let the stain completely dry overnight. And because it is still cold in my garage, I can't use a water-based finish. I sprayed four coats of satin lacquer from Deft for the finish. Each coat will magnify the wood patterns.
     The major new techniques in this project have been Sketchup and sliding dovetail joints. So far, I'm happy with both.