Showing posts with label Certainly Wood. Show all posts

Thursday, May 16, 2013

Use Solid Wood or Veneer?

Solid Wood or Veneer?
I have issues with using solid wood.

  • There are few lumberyards where I live (Colorado) that sell solid wood. The big box stores have a limited selection of hardwood: red oak, birch, and maple. We have a Rockler and Woodcraft store, but solid wood is expensive.
  • With solid wood, the construction must accommodate expansion and contraction.
  • A joiner and planer is very handy when working with solid wood, but I just don't have room for them.

  • To address these issues I typically use veneer over cabinet-grade plywood. The benefits are
    • Cabinet-grade plywood is readily available at the big box stores. It may already have a paper-thin veneer of oak or birch on it, so I just glue my veneer over it.
    • Plywood is less susceptible to issues of wood movement due to humidity fluctuations. This simplifies the design and construction.
    • Veneer is significantly less expensive than solid wood as it should be; you are only getting a fraction of the wood. Higher quality veneer is around 1/40" thick. This may sound like it could be easily damaged, but its pretty resilient when glued to plywood. I wouldn't recommend abusive applications like stair treads, but book shelves, cabinets, and many table designs could easily use veneer.
    • Some awesome veneer is available on the internet. I've been buying veneer from Certainlywood for years.
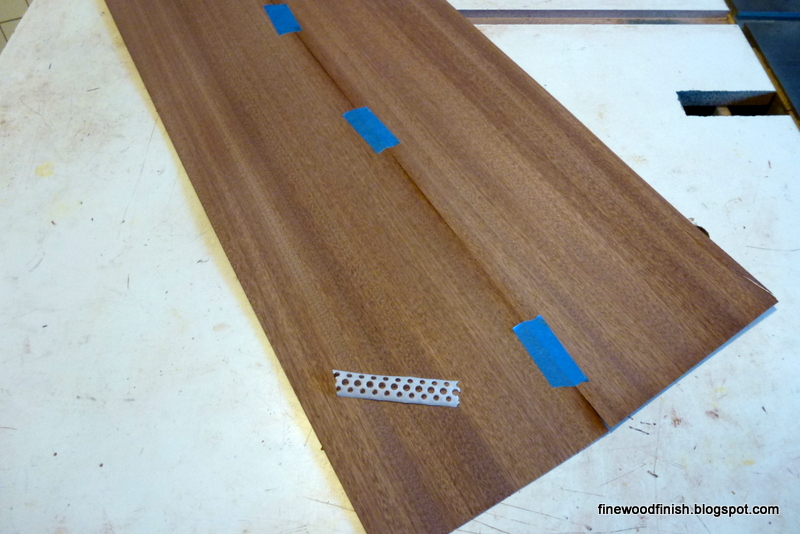
    Often veneer strips may be only 4" to 6" wide, so they must be glued side-by-side when a wide board is required. Because the veneer edges can be fairly uneven, I first cut them straight. When I started to use veneer, the biggest challenge I had was tearout when cutting them. I've discussed my solution to this problem in an earlier blog.

    Tape holds the veneer strips together when gluing. First I use blue painters tape to temporarily hold the pieces, then I turn the veneer over apply veneer tape to hold the pieces during the gluing operation.
    The veneer tape is the white strip with holes in the picture on the right. It has an adhesive backing that is activated with water like a postage stamp (used to be). Because the tape is so thin, its outline won't be pressed into the veneer. When the tape dries, flip the veneer over again and remove the blue painters tape.

    I use Titebond II glue to bond the veneer to the plywood. I frequently stain the veneer using a water-base dye and before I started using Titebond II, I experienced some veneer delamination. Some woodworkers have raised concerns that it may setup too quickly, but I've never had a problem. I usually clamp it for an hour to assure a secure bond.

    I'll talk about edge treatments in a later blog entry.


    Thursday, March 21, 2013

    Sliding Dovetail Update

    For my kitchen cabinet project, I wanted to use a modular approach to installing cabinets. Typically each cabinet is standalone, and are bolted together as they are installed. This means that between the cabinets are two walls, the right side of the cabinet on the left and the left side of the cabinet on the right. In furniture cabinets, only one wall would be used. I'm using sliding dovetails to allow cabinets to be interconnected while sharing a common wall.

    The final cabinet will consist of five interconnected cabinets. The center cabinet shown below will hide trash and recycle containers on a pull out shelf. I plan to install this cabinet into the kitchen and then connect additional cabinets by sliding their walls into the corners of the installed cabinet.


    The jig that I described in my sliding dovetail blog entry is working well. The cabinet sides are square and secure and if I need to use my router table for something else, the jig allows me to replicate the precise positions necessary to duplicate a cut.

    Mission Style Finishing

    Quarter-sawn white oak veneer purchased from Certainly Wood is used on most of the exposed wood surfaces. The panel frames on the pull out drawer face were made from recycled oak flooring. To have a 1" wide frame, I've ripped and glued together two flooring pieces. A white oak veneer hides the glue seam. To strengthen this frame, I've inserted dowels (shown on the left) and then to hide them, I applied another piece of veneer (shown on right).

    Since this blog is oriented to wood finishing, I wanted to discuss my revised Mission Style finishing treatment.
    I do a lot of Mission Style finishing and have some recipes on my blog. Here are my NEW easiest steps, with most products available from your local big box store.


    1. Sand the wood surface to 150 grit.
    2. Use a very diluted water-based dye stain. It should look like a weak tea. This dye colors the wood but allows the rays and flakes to still be visible. Spray the dye if possible, otherwise flood the surface. For the dye, I use TransTint. It's in the jar on the left in this picture.
    3. Let the dye dry thoroughly and then spray with an unwaxed shellac (Bulls Eye, next to the dye in the picture). This protects the dye from subsequent steps.
    4. I use Minwax Gel Stain to highlight the grain and figure in the wood (third from the left). I mixed one part Mahogany to four parts Antique Maple to get the color I wanted. After a minute or so, wipe the stain off across the grain. This leaves stain in the grain.
    5. This is important, let the stain completely dry overnight. And because it is still cold in my garage, I can't use a water-based finish. I sprayed four coats of satin lacquer from Deft for the finish. Each coat will magnify the wood patterns.
     The major new techniques in this project have been Sketchup and sliding dovetail joints. So far, I'm happy with both.

    Saturday, January 7, 2012

    Mission Style End Table with Slate, Part 1

    I've wanted to integrate slate with wood and thought I'd share my progress on an end table that I've just started. I had a piece of plain sawn oak that I want to make more interesting. I glued quarter-sawn white oak veneer to it to make the top more interesting. I plan to apply the Mission Style finish that I described in an earlier posting.

    Here is what it looks like after applying Mahogany gel stain. Notice that the grain pattern is now more visible because the pigment gets lodged into the pores. I'm going to let it dry over night and then sand off any stain on the wood surface while leaving the stain in the grain to accentuate the pattern.


    After I sanded the stain with 220 grit, I sprayed on a brown water-based dye. To protect the dye from subsequent operations, I then sprayed with Bulls Eye Shellac. Now I'm ready to glue the plywood bottom for the slate and then insert the tile into the tabletop.

    Monday, November 28, 2011

    Night Stand

    I wanted to show you what I did with the table top that was used to try different spraying techniques. The center of the top is ash veneer on plywood and the surrounding wood is a figured cherry veneer on plainsawn cherry. I ran out of cherry for the legs and was wondering how close I could match the color using poplar. I sprayed the same red dye as I had used on the cherry, then sealed it by spraying with clear shellac. Finally, I used a water-based finish. The whole finishing process took less than three hours of which two and half were waiting for the wood to dry.

    The wood surface on the legs is a little rougher than I want. The water in the dye has caused some of the wood fibers to raise. I could have tried sanding it lightly after applying the shellac, but I was concerned about removing some of the stain. Next time I will first spray the wood with water and sand it smooth after it dries.

    I'm please with the poplar and feel that I could have applied veneer over it on the table top and saved some money.


    Thursday, November 10, 2011

    Mission Style Finish Recipe

    My computer desk
    I'm really attracted to the Mission Style finish. The character of the wood is really highlighted by this stain treatment. I use quarter-sawn white oak, the traditional wood used in mission style furniture. Cutting wood quarter-sawn reveals an immense pattern of rays and flakes in oak. Their undulating pattern is accentuated by a pigment stain. An additional dye stain gives the wood your desired shade of brown. Traditionally, staining the wood was performed by exposing it to strong ammonia fumes. I tried this once and became the least favorite member of the family.

    Over many years, I have created a multiple step process that works reliably. As I have said in previous posts, I tend to use veneer. It is much more affordable and available than solid wood. I purchase my veneer online from Certainly Wood.

    Here are the steps and an explanation of why are done.
    1. Sand the wood surface until you reach 180 grit. There is no reason to go finer.
    2. The pattern in the wood is highlighted by creating contrast between the grain and the wood surface. I use a Mahogany colored Minwax Gel Stain to embed a dark pigment in the grain. Use a disposable glove and spread clumps of stain on the wood. Almost immediately, take paper towels and remove the excess stain on the wood surface by wiping across the grain. This leaves the pigment in the grain and leaves the wood surface almost the same color as what you started with.
    3. Let the gel stain dry for 8 hours or until it's solvent can't be smelled.
    4. Preferably using an orbital sander, use 220 grit sandpaper to remove the stain color from the wood surface. The pigment stain will remain in the grain which is below the surface. You want to color the surface with the water-based dye stain. I like to use Homestead's TransTint. They have many brown shades located here.
    5. Apply a dye stain either by spraying or wiping it on the surface. Spraying is faster but I've wiped it on for many years. I pore a little on and spread it lightly with a 3M maroon colored Scotch-brite pad. You want the get the surface universally wet with thin film of dye. Let the dye dry without wiping it off. This will give it a uniform appearance, as long as you didn't leave puddles of dye liquid on the wood.
    6. The dye usually drys within a hour. Spray it with Bulls Eye Clear Shellac to protect the dye from later steps.
    7. After the shellac drys (usually in minutes), feel the surface for smoothness. Sometimes the water in the dye will raise the wood fibers. Lightly sand them off using a maroon pad. Don't bare down which may remove the stain.
    8. Now you are ready for a finish to protect the wood and the stain. The shellac you applied will protect the stains from most finish treatments. I like to use a water-based satin finish. The satin sheen lowers any glare from light reflecting from the wood surface which obscures the grain. I use Minwax Polycrylic Satin Finish. I'll spray Polycrylic deluded 10% with distilled water. Deluding it makes it easier to spray. Let it dry for several hours and feel if the surface is smooth. If so, spray it one more time and you are done. If its a little rough, wait overnight and sand the surface lightly with 220 grit sandpaper, just enough to remove the rough spots. Spray it again, and then you are done.
    I'm sure this seems like many steps but the end product is worth the effort.