Using adhesive veneer edging can be an easy repair or essential part of project. Although purists may frown on edging, I find that it can be used imperceptibly to most people. Most veneer edging is thick enough to resist physical abuse. And it is real wood, so stains apply easily.
Applying Adhesive Edging
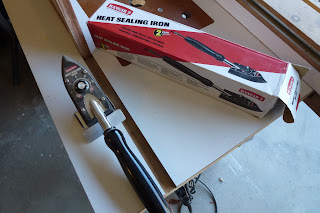
Adhesive veneer is typically about 1/16" thick and backed with a heat sensitive adhesive backing. Many of the usual hardwoods are sold: cherry, oak, birch, walnut, and mahogany and widths range from ¾" to wider. An iron melts the adhesive backing to adhere the edging. I like to use this small and economical iron. Just using scissors, cut a length of veneer slightly longer than the edge being covered.
Trimming Adhesive Edging
In my experience, trimming the edging can be a challenge. Depending on grain direction, tear out can occur when cutting it. I've used a router bit with a bearing for cutting flush trim cuts and still have had problems. Through trial and error I've come up with the following techniques.

On the ends, I just align a chisel against the work piece and cut the overhanging edging off.

When trimming the sides, the grain direction can be frustrating. For reliable results, I use the blade from my plane to cut the sides of the edging. I rest part of the blade on the side of work piece and cut the overhanging veneer at an angle. I rotate the blade clockwise and cut off a small length, then move the blade to the left and repeat the process. This scissor-like action seems to handle difficult grain direction. I usually start from the middle and work towards the end of the veneer.
After trimming the overhang, I usually run the iron at a slight angle to seal the edges to the work piece again. Then I lightly sand the edge of the veneer for a slight round over. After applying finish to the piece, its difficult to know that veneer was used.
Veneer Gaps After Dyeing
Occasionally after applying a water-base dye, the veneer may separate from the substrate. Look for this before a finish or lacquer is applied. Just use the iron to reattach the veneer. Heating a finish will destroy it, so reattach the veneer before applying the finish.

Applying Adhesive Edging
Adhesive veneer is typically about 1/16" thick and backed with a heat sensitive adhesive backing. Many of the usual hardwoods are sold: cherry, oak, birch, walnut, and mahogany and widths range from ¾" to wider. An iron melts the adhesive backing to adhere the edging. I like to use this small and economical iron. Just using scissors, cut a length of veneer slightly longer than the edge being covered.

Trimming Adhesive Edging
In my experience, trimming the edging can be a challenge. Depending on grain direction, tear out can occur when cutting it. I've used a router bit with a bearing for cutting flush trim cuts and still have had problems. Through trial and error I've come up with the following techniques.

On the ends, I just align a chisel against the work piece and cut the overhanging edging off.

When trimming the sides, the grain direction can be frustrating. For reliable results, I use the blade from my plane to cut the sides of the edging. I rest part of the blade on the side of work piece and cut the overhanging veneer at an angle. I rotate the blade clockwise and cut off a small length, then move the blade to the left and repeat the process. This scissor-like action seems to handle difficult grain direction. I usually start from the middle and work towards the end of the veneer.
After trimming the overhang, I usually run the iron at a slight angle to seal the edges to the work piece again. Then I lightly sand the edge of the veneer for a slight round over. After applying finish to the piece, its difficult to know that veneer was used.
Veneer Gaps After Dyeing
Occasionally after applying a water-base dye, the veneer may separate from the substrate. Look for this before a finish or lacquer is applied. Just use the iron to reattach the veneer. Heating a finish will destroy it, so reattach the veneer before applying the finish.


