Thursday, March 21, 2013

Sliding Dovetail Update

For my kitchen cabinet project, I wanted to use a modular approach to installing cabinets. Typically each cabinet is standalone, and are bolted together as they are installed. This means that between the cabinets are two walls, the right side of the cabinet on the left and the left side of the cabinet on the right. In furniture cabinets, only one wall would be used. I'm using sliding dovetails to allow cabinets to be interconnected while sharing a common wall.

The final cabinet will consist of five interconnected cabinets. The center cabinet shown below will hide trash and recycle containers on a pull out shelf. I plan to install this cabinet into the kitchen and then connect additional cabinets by sliding their walls into the corners of the installed cabinet.


The jig that I described in my sliding dovetail blog entry is working well. The cabinet sides are square and secure and if I need to use my router table for something else, the jig allows me to replicate the precise positions necessary to duplicate a cut.

Mission Style Finishing

Quarter-sawn white oak veneer purchased from Certainly Wood is used on most of the exposed wood surfaces. The panel frames on the pull out drawer face were made from recycled oak flooring. To have a 1" wide frame, I've ripped and glued together two flooring pieces. A white oak veneer hides the glue seam. To strengthen this frame, I've inserted dowels (shown on the left) and then to hide them, I applied another piece of veneer (shown on right).

Since this blog is oriented to wood finishing, I wanted to discuss my revised Mission Style finishing treatment.
I do a lot of Mission Style finishing and have some recipes on my blog. Here are my NEW easiest steps, with most products available from your local big box store.


  1. Sand the wood surface to 150 grit.
  2. Use a very diluted water-based dye stain. It should look like a weak tea. This dye colors the wood but allows the rays and flakes to still be visible. Spray the dye if possible, otherwise flood the surface. For the dye, I use TransTint. It's in the jar on the left in this picture.
  3. Let the dye dry thoroughly and then spray with an unwaxed shellac (Bulls Eye, next to the dye in the picture). This protects the dye from subsequent steps.
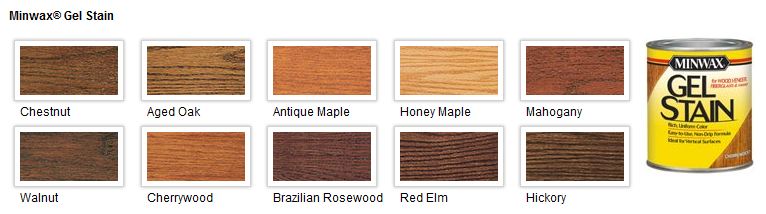
  4. I use Minwax Gel Stain to highlight the grain and figure in the wood (third from the left). I mixed one part Mahogany to four parts Antique Maple to get the color I wanted. After a minute or so, wipe the stain off across the grain. This leaves stain in the grain.
  5. This is important, let the stain completely dry overnight. And because it is still cold in my garage, I can't use a water-based finish. I sprayed four coats of satin lacquer from Deft for the finish. Each coat will magnify the wood patterns.
 The major new techniques in this project have been Sketchup and sliding dovetail joints. So far, I'm happy with both.

Thursday, February 21, 2013

Sliding Dovetails Made Easier

Mortise and Tenon
To keep a dresser or cabinet from racking, a secure joint is needed to keep the sides perpendicular to the top and bottom. There are many ways to accomplish this but a mortise and tenon joint is commonly used to connect horizontal rails to the vertical sides or legs. For the kitchen cabinet that I'm building, I need to connect up to three walls together and using mortise and tenon would be difficult.


For this project, I've decided to use sliding dovetails to interlock the walls together. Their shape resists any horizontal movement which would cause racking. Besides, I'm not that great at cutting mortises anyway.

End view of a Sliding Dovetail

Challenges of Cutting Sliding Dovetails

Sliding dovetails can be efficiently cut on a router table but the fence position and bit height is critical. Determining the fence position is a trail and error process. Centering the tail and getting the tail width just right can be tasking. When cutting the slot for the pin, using a straight bit to remove a portion of the material makes a cleaner cut when following it up with the dovetail bit.

Returning the Fence to Positions Accurately

After spending a considerable amount of time determining a fence position for a pin or a tail, this technique will allow the fence to return to those positions. To accomplish this, we need to reference the position of the fence to a fixed reference. The spacer backstop is this reference and is simply a 1.5" wide piece of scrap wood that is mounted flush to the back of the router table. A spacer, also made of scrap wood, is used to position the router table fence at a desired position.

I usually start this process with the cutting the pin. A pin is a profile cut into a work piece with a shape that will accommodate a dovetail-shaped tail. A tail is this shape, usually formed with a router bit with a 14° cutting angle. For each width work piece, a custom length spacer needs to be created.
Routing Pins

The same jig works for cutting pins, however an auxiliary fence is added. This is a piece of scrape wood surrounds the router bit and supports the wood fibers as the cut is being made to prevent a rough edge on the work piece. Be sure to keep this auxiliary fence because the spacers you will be cutting are dependent on it. To determine the correct length of the spacer, pick a fence position that you guess is the right distance from the router bit. Cut a scrape piece that is exactly the same width as your work piece and rout both sides. The resulting tail on the scrape piece should fit snugly in the pin grove. If you must use significant force, any glue upon the tail will be wiped off on assembly and the joint won't be secure.

Cutting the Tail Spacer

Cut a new spacer on your tablesaw that will fit between the fence and the spacer backstop, loosen the fence, insert the spacer, move the fence against it and tighten the fence. You will now verify again the the tail width is correct. DON'T MOVE YOUR TABLESAW FENCE. Just flip the scrap piece over, cut a new tail, and test it in the pin grove. If it is too loose, the spacer needs to be slightly shortened. Lightly tap the fence on your tablesaw to make this adjustment, remove and re-cut the spacer, and try again until the desired tail width is obtained. If the joint is too tight then the spacer is too short, cut a new slightly longer spacer and repeat the process.When the spacer is the correct length, label it as to its purpose.

Routing Tails

Summary

So now you have created custom length spacers (and an auxiliary fence) that will allow you to create sliding tails and pins for your furniture or cabinetry. As an alternative to mortise and tenon, sliding dovetails allow easy modular expansion of cabinetry without tenons. Out of the container, glues are too thick for sliding dovetails, so I recommend diluting glues with water. According to Franklin, Titebond II can be thinned with water by 5% without any weakening of adhesion strength.

Thursday, February 7, 2013

Kitchen cabinet preparation

I've started a kitchen cabinet project and used Sketchup for my design. My requirement is for the cabinets to share walls. This is very different for typical kitchen cabinets where each cabinet is a complete box. Using this construction, multiple cabinets side-by-side means that there are two walls between each cabinet. Typically in furniture construction, cabinets would share a wall.


So what is the issue with this type of construction? At the top of the list is how to make and install it. A 101" wide series of cabinets made in the shop and then moved to a kitchen would be challenging. It is more modular to have a series of separate boxes and then screw them together as they are installed. Often these cabinets are frameless, otherwise the face frame will become very wide.

For this project, I plan to use recycled oak flooring. I started using flooring on a previous project. My reason is purely economic. Solid wood is expensive but reclaimed oak is $1.25 a square foot. A piece of flooring is shown on the left in this picture. After removing any nails or staples, I rip off the tongue on one side and the groove on the other. Since the flooring bottom is recessed in areas, I rip the bottom too for a flat surface. The final board is a little over 5/8" thick.

Sketchup has allow me to view the size proportions of the rails, stiles, drawers and cabinet walls without having to make a prototype or just live with the results. For this project I have a 1 ¼" wide wall. I use two flooring boards glued back-to-back to achieve this width. My tablesaw is the clamping surface and any warp that the flooring had is eliminated.


I plan to use sliding dovetails to hold a frame for the cabinet face and to connect the cabinets together. Preparing the flooring is taking a while but I'd rather save on the cost of wood.


This shows the face frame with a drawer and door opening made from cabinet-grade plywood which I had applied quarter-sawn white oak veneer. I will use veneer edging to cover the exposed inside edges. The piece of wood in the center shows a sample of the wood flooring. To cover the glue seam, I glued veneer and then rounded over the edges.

Thursday, January 24, 2013

Sketchup and Cabinet Design

The wood finish is fine, the construction is strong, but sometimes I'm disappointed in the final result. The cabinet face is too bland or something is out of proportion. I seldom draw to scale so I only have a feeling of what the end result will be. I've decided to make a plunge into Sketchup and have started of a series of postings about my kitchen cabinet project.


I'm making a series of cabinets for my kitchen to fill a 101" wide opening using a Mission Style theme. My plan is to use face frame construction to give a furniture look to the project. The center cabinet will be a sliding shelf with three waste/recycle containers. The design constraints for supporting this will define the dimensions of the drawer and doors of the surrounding cabinets.


Using Sketchup has required time to learn (several days), but with this one time investment in time I feel I have a quicker and cheaper means of evaluating design alternatives.


Saturday, December 29, 2012

Mixing and Matching Wood Stains

I've bought my fair share of cans of stain over the years. They were typically little cans with approximations of the stain color on the lids and obscure names like "American Oak". My routine was to buy a can, try to mix the pigment and the solvent together in this little can without it spilling all over my workbench, and then apply it to a sample piece of wood. More often than not, the color was disappointing. What a waste of time and money.


Pigments and Dyes Make Stains

Stains use pigments and/or dyes to produce different effects. In general, pigments will enhance the wood grain and dyes will display the figure in the wood. Used together, your stain application can be one of the highlights of your project.

Pigments are the basis for paints but when they are deluded in a solvent, they will fall into the grain that is characteristic in wood species like oak or ash. The pigment particles are too large to be absorbed into the wood so when you wipe the excess stain off across the grain, a small amount of pigment remains in the grain pores. Most people are disappointed when using pigment stains on maple or birch. The pigment particles are too large to be absorbed into the wood and since these species have minimal grain, little color remains after wiping off the excess stain.

Dyes have smaller particles than pigments and they dissolved into a solvent, so no stirring is required..  The solvents can be water, shellac or mineral oil and their purpose is to carry the dye to the wood and they . Dyes are absorbed into the top layer of the wood and work well with changing the color of most wood species.


Mixing and Matching Wood Stains

So pigment stains will emphasize the wood grain and dyes stains will change the wood color. When do you use pigments or dyes, or both? I typically will always use dye to color the wood, and on occasion, use pigments to emphasize the grain. In my Mission Style post, I first applied a dark pigment to highlight the grain, then followed with a reddish-brown colored dye to color the wood. For my table, I wanted to color the pale cherry veneer to the red color expected from cherry. Applying a red dye allowed me to accelerate the decades required to obtain the natural redness of cherry.

Applying a Pigment

To control my results, I typically use Minwax Gel Stains when applying pigments. In this case, gel is the solvent and the pigment is suspended in the gel. I prefer gel because it provides consistency between applications. And the gel reduces the uneven absorption of stain which causes blotching. Cherry and pine are especially prone to blotching.

If you are pleased with the final results of a gel stain, you can skip the dye application step and go straight to applying a finish. In my case, In my case, I want the gel to fill the grain with a dark or medium brown color. I don't always like the dye color results, so I wait for the gel to dry, and then sand off the wood surface using a 150 grit sandpaper with my orbital sander. I want to leave the pigment in the grain, to I only sand the surface to obtain its original color.

Applying a Dye

So now the wood grain is emphasized, but the wood surface is still the color of the raw wood.