Saturday, December 29, 2012

Mixing and Matching Wood Stains

I've bought my fair share of cans of stain over the years. They were typically little cans with approximations of the stain color on the lids and obscure names like "American Oak". My routine was to buy a can, try to mix the pigment and the solvent together in this little can without it spilling all over my workbench, and then apply it to a sample piece of wood. More often than not, the color was disappointing. What a waste of time and money.


Pigments and Dyes Make Stains

Stains use pigments and/or dyes to produce different effects. In general, pigments will enhance the wood grain and dyes will display the figure in the wood. Used together, your stain application can be one of the highlights of your project.

Pigments are the basis for paints but when they are deluded in a solvent, they will fall into the grain that is characteristic in wood species like oak or ash. The pigment particles are too large to be absorbed into the wood so when you wipe the excess stain off across the grain, a small amount of pigment remains in the grain pores. Most people are disappointed when using pigment stains on maple or birch. The pigment particles are too large to be absorbed into the wood and since these species have minimal grain, little color remains after wiping off the excess stain.

Dyes have smaller particles than pigments and they dissolved into a solvent, so no stirring is required..  The solvents can be water, shellac or mineral oil and their purpose is to carry the dye to the wood and they . Dyes are absorbed into the top layer of the wood and work well with changing the color of most wood species.


Mixing and Matching Wood Stains

So pigment stains will emphasize the wood grain and dyes stains will change the wood color. When do you use pigments or dyes, or both? I typically will always use dye to color the wood, and on occasion, use pigments to emphasize the grain. In my Mission Style post, I first applied a dark pigment to highlight the grain, then followed with a reddish-brown colored dye to color the wood. For my table, I wanted to color the pale cherry veneer to the red color expected from cherry. Applying a red dye allowed me to accelerate the decades required to obtain the natural redness of cherry.

Applying a Pigment
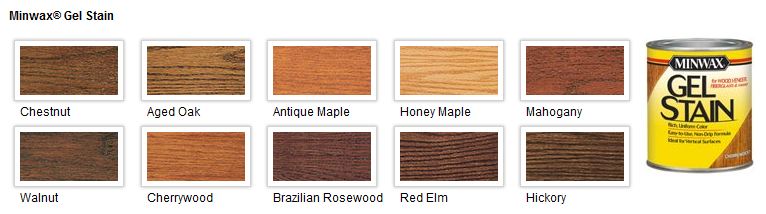
To control my results, I typically use Minwax Gel Stains when applying pigments. In this case, gel is the solvent and the pigment is suspended in the gel. I prefer gel because it provides consistency between applications. And the gel reduces the uneven absorption of stain which causes blotching. Cherry and pine are especially prone to blotching.

If you are pleased with the final results of a gel stain, you can skip the dye application step and go straight to applying a finish. In my case, In my case, I want the gel to fill the grain with a dark or medium brown color. I don't always like the dye color results, so I wait for the gel to dry, and then sand off the wood surface using a 150 grit sandpaper with my orbital sander. I want to leave the pigment in the grain, to I only sand the surface to obtain its original color.

Applying a Dye

So now the wood grain is emphasized, but the wood surface is still the color of the raw wood.

Wednesday, November 21, 2012

Mounting Cabinet Doors With Amerock Hinges


Mounting doors can be a frustrating activity. The gaps around the doors need to be uniformly narrow and the door needs to fit flush to the cabinet frame. European hinges provide all sorts of adjustments, but the door mounts over a frameless cabinet instead of inside a face frame. Furniture-like cabinets use inset doors inside a face frame. Installing these doors require more demanding tolerances and skill to mount, but they look more professional than a door laying over a frameless cabinet.


Although many commercial cabinets are frameless and use 35mm European hinges, I think these lack woodworker craftsmanship. For door hinges on face framed cabinets, I like to use the Amerock full wrap, full inset hinges. To make things a little more challenging, hinges can either support a face frame attached flush to the inside wall of the cabinet, or a frame that is proud of the cabinet side. I prefer the frame to be flush with the cabinet side which allows items to be removed from the cabinet without scraping your knuckles on the frame.

This hinge has been designed for ¾" wide doors, but doors can be accommodated ± ¹/₁₆" by adjusting the mounting the hinge on the frame. Unfortunately there is no slot for adjusting the door in or out of the frame. You just need to drill the mounting holes exactly.

The slots on the frame wing allow the door to be adjusted ³/₁₆" vertically. The hinge's door wing slots allow the door to be adjusted horizontally, however I typically use the door edge screw and door side screw to attach the door, otherwise the door can rock in the hinge. Using the horizontal door adjustment moves the door away from the bracket with the edge screw making these slots useless.

Attaching the Hinge: Frame or Door First?

I like to attach the hinge to the cabinet frame first. The challenge is where to drill the mounting holes in the frame. The goal is to have the surface of the door be flush to the edge of the frame. Since there is no slot in the Amerock hinge that allows adjusting door slightly into or out of the frame, exact mounting of the hinge is required.

This diagram shows what hole distance that must be determined. If the door is exactly ¾" thick, the hinge screws should be ⅜" from the corner of the frame. Since door thickness will vary, I verify the hole distance using a jig to try the hinge with a piece of scrap wood that is the same thickness as my door.


I use a wheeled marking gauge that scribes a fine line ⅜" from the edge of the scrap piece. The orange circle shows the cut. I attach the hinge to the wood.


Setting a piece of scrap into the hinge representing the door, I verify how flush the door is with the frame. If adjustments are needed, I adjust the cutting wheel on the gauge slightly in or out for another test. I remount the hinge using the new gauge setting, and keep trying again until I've determined that critical distance.


When the door is flush, the gauge is at the required distance for the hinge mounting. If I need the gauge for something else, I can replicate the distance by inserting the gauge wheel into the scribed line and adjusting the gauge so the brass shoe is flush to side of the jig.

Mounting the Hinge on the Frame

I usually mount a hinge a couple of inches from the top and bottom of the frame. The door size will define what "looks" right for hinge placement.

The Amerock hinge is 2 ½" tall and the holes on the Amerock hinges are 1 ¹¹/₁₆" apart.
Accurately Mounting the Hinges on the Frame

Using the gauge to mark the set back distance for the mounting holes, and marking the distance between the holes, I'm ready to drill holes into the frame. I use a marking knife to scribe the vertical position of the hinge screw locations. An X-Acto knife will work as well. Lightly drag a center punch across the intersecting scribes to locate the cross and tap the punch to mark the center of the cross to guide the drill. Drill the mounting holes and attach the hinge to the frame.


Mounting the Hinge to the Door

The door should be correctly cut for the frame. Slight cut adjustments to the door may be required (usually in my case) for a uniform gap to show between the door and the frame. After these cuts have been made, the hinge can be mounted.

With the hinge mounted on the frame, measure the distance from the top of the frame to the top of the hinge's door edge hole.  The hinges allow for a small vertical correction (³/₁₆") in door position to allow a symmetrical gap to show above and below the door.


Tuesday, November 20, 2012

Applying Adhesive Veneer Edging

Using adhesive veneer edging can be an easy repair or essential part of project. Although purists may frown on edging, I find that it can be used imperceptibly to most people. Most veneer edging is thick enough to resist physical abuse. And it is real wood, so stains apply easily.

Applying Adhesive Edging

Adhesive veneer is typically about 1/16" thick and backed with a heat sensitive adhesive backing. Many of the usual hardwoods are sold: cherry, oak, birch, walnut, and mahogany and widths range from ¾" to wider. An iron melts the adhesive backing to adhere the edging. I like to use this small and economical iron. Just using scissors, cut a length of veneer slightly longer than the edge being covered.


Trimming Adhesive Edging

In my experience, trimming the edging can be a challenge. Depending on grain direction, tear out can occur when cutting it. I've used a router bit with a bearing for cutting flush trim cuts and still have had problems. Through trial and error I've come up with the following techniques.


On the ends, I just align a chisel against the work piece and cut the overhanging edging off.

 
When trimming the sides, the grain direction can be frustrating. For reliable results, I use the blade from my plane to cut the sides of the edging. I rest part of the blade on the side of work piece and cut the overhanging veneer at an angle. I rotate the blade clockwise and cut off a small length, then move the blade to the left and repeat the process. This scissor-like action seems to handle difficult grain direction. I usually start from the middle and work towards the end of the veneer.

After trimming the overhang, I usually run the iron at a slight angle to seal the edges to the work piece again. Then I lightly sand the edge of the veneer for a slight round over. After applying finish to the piece, its difficult to know that veneer was used.

Veneer Gaps After Dyeing

Occasionally after applying a water-base dye, the veneer may separate from the substrate. Look for this before a finish or lacquer is applied. Just use the iron to reattach the veneer. Heating a finish will destroy it, so reattach the veneer before applying the finish.


Monday, November 19, 2012

Holding Cabinet Doors Closed Magnetically

Holding doors closed using magnets is easy compared to mechanical latching systems or special hinges. Simply, the door is held close using a small rare-earth magnet embedded in the frame. Another magnet or metal dowel is embedded in the door. When the door is closed, magnetic attraction keeps the door closed. A gentle pull on the door will break the attraction and allow the door to open freely.


Sounds easy, but what are the details? I find that a ¼" diameter magnetic is sufficient and I simply drill a ¼" hole and insert the magnet. To ensure the face of the door is flush to the frame, the magnets should be positioned the same distance from the front of the cabinet. To hide the magic of the magnet, I apply veneer hot-melt edging over the magnet.


For this door I embedded a short metal dowel in the door. It is located just under the handle on the edge of the door and covered by veneer. The video shows the closing of the door. The narrow gaps between the door and the frame cause an air cushion that slows the closing of the door. When the metal dowel gets within the proximity of the magnet, the door is pulled close.

Wednesday, May 16, 2012

Finishing the Semi-Circle Table

After finishing the top, I wanted to carry the same design elements into the apron and legs. For the apron, I added a strip painted birch. I've been pleased with using Valspar in the past and the quantity of paint provided in a  sample size is more than enough for a small furniture project. I wanted to see whether I could spray it with my touch-up gun without diluting it with water and I successfully applied with using a 1.5mm nozzle.


Below the painted birch is another semi-circle of cherry which is was shaped with a bead profile. To conserve cherry, I glued a thin strip of it to plywood from a reclaimed cupboard door. Using 10 wedges, I calculated that my narrow ½" cherry scrap piece would be sufficient width to accommodate the curve and show the profile.

Similar to my previous table project, I've used reclaimed oak flooring to make the legs. After removing any nails from the wood, I glue several pieces together and use my router to cut the bead profile in the sides. I've sprayed a light brown dye stain on them, followed with shellac as a barrier coat. Finally, several coats of Polycrylic water-based finish was applied.

In order to use as much reclaimed wood as possible, I only have a thin strip of cherry on the profiled edge. Notice that the figured cherry veneer overlaps this and extends to the edge of the table.


Here is a close up picture of the ash center, cherry edging, and the oak legs.